VPC
Requirements:
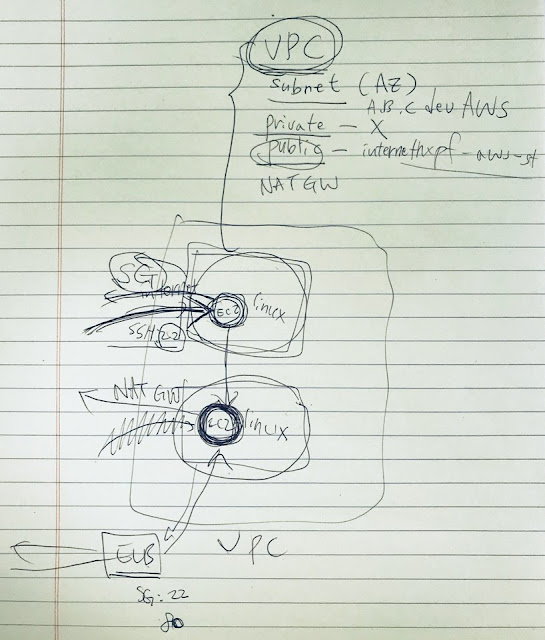
CREATE VPC
- Subnet (AZ)
-> Public
-> Internet connection both of inbound and outbound
-> SG(Secret Gate, whitelist)
-> SSH(port 22) open for the office IP
-> Linux framework
-> ec2 instance
-> In order to access to the private
-> Private
-> No internet connection.
-> Linux, ec2, web application (port 80)
-> NAT gateway for the outbound
-> ELB(gateway) to aceess to the private
-> SG(Secret Gate, whitelist)
-> SSH(port 22) open for the office IP

References:
Amazon Virtual Private Cloud: https://aws.amazon.com/vpc/
ebooks:
Amazon Virtual Private Cloud (Amazon VPC) lets you provision a logically isolated section of the AWS Cloud where you can launch AWS resources in a virtual network that you define. You have complete control over your virtual networking environment, including selection of your own IP address range, creation of subnets, and configuration of route tables and network gateways. You can use both IPv4 and IPv6 in your VPC for secure and easy access to resources and applications.
You can easily customize the network configuration for your Amazon VPC. For example, you can create a public-facing subnet for your web servers that has access to the Internet, and place your backend systems such as databases or application servers in a private-facing subnet with no Internet access. You can leverage multiple layers of security, including security groups and network access control lists, to help control access to Amazon EC2 instances in each subnet.
Additionally, you can create a Hardware Virtual Private Network (VPN) connection between your corporate data center and your VPC and leverage the AWS Cloud as an extension of your corporate data center.

Scenario: VPC with Public and Private Subnets (NAT)
The configuration for this scenario includes a virtual private cloud (VPC) with a public subnet and a private subnet. We recommend this scenario if you want to run a public-facing web application, while maintaining back-end servers that aren't publicly accessible. A common example is a multi-tier website, with the web servers in a public subnet and the database servers in a private subnet. You can set up security and routing so that the web servers can communicate with the database servers.
The instances in the public subnet can send outbound traffic directly to the Internet, whereas the instances in the private subnet can't. Instead, the instances in the private subnet can access the Internet by using a network address translation (NAT) gateway that resides in the public subnet. The database servers can connect to the Internet for software updates using the NAT gateway, but the Internet cannot establish connections to the database servers.
Note
You can also use the VPC wizard to configure a VPC with a NAT instance; however, we recommend that you use a NAT gateway. For more information, see NAT Gateways.
This scenario can also be optionally configured for IPv6—you can use the VPC wizard to create a VPC and subnets with associated IPv6 CIDR blocks. Instances launched into the subnets can receive IPv6 addresses, and communicate using IPv6. Instances in the private subnet can use an egress-only Internet gateway to connect to the Internet over IPv6, but the Internet cannot establish connections to the private instances over IPv6. For more information about IPv4 and IPv6 addressing, see IP Addressing in Your VPC.
Overview
The following diagram shows the key components of the configuration for this scenario.
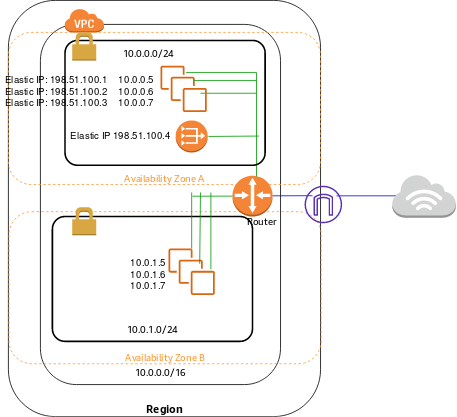
The configuration for this scenario includes the following:
- A VPC with a size /16 IPv4 CIDR block (example: 10.0.0.0/16). This provides 65,536 private IPv4 addresses.
- A public subnet with a size /24 IPv4 CIDR block (example: 10.0.0.0/24). This provides 256 private IPv4 addresses. A public subnet is a subnet that's associated with a route table that has a route to an Internet gateway.
- A private subnet with a size /24 IPv4 CIDR block (example: 10.0.1.0/24). This provides 256 private IPv4 addresses.
- An Internet gateway. This connects the VPC to the Internet and to other AWS services.
- Instances with private IPv4 addresses in the subnet range (examples: 10.0.0.5, 10.0.1.5). This enables them to communicate with each other and other instances in the VPC.
- Instances in the public subnet with Elastic IPv4 addresses (example: 198.51.100.1), which are public IPv4 addresses that enable them to be reached from the Internet. The instances can have public IP addresses assigned at launch instead of Elastic IP addresses. Instances in the private subnet are back-end servers that don't need to accept incoming traffic from the Internet and therefore do not have public IP addresses; however, they can send requests to the Internet using the NAT gateway (see the next bullet).
- A NAT gateway with its own Elastic IPv4 address. Instances in the private subnet can send requests to the Internet through the NAT gateway over IPv4 (for example, for software updates).
- A custom route table associated with the public subnet. This route table contains an entry that enables instances in the subnet to communicate with other instances in the VPC over IPv4, and an entry that enables instances in the subnet to communicate directly with the Internet over IPv4.
- The main route table associated with the private subnet. The route table contains an entry that enables instances in the subnet to communicate with other instances in the VPC over IPv4, and an entry that enables instances in the subnet to communicate with the Internet through the NAT gateway over IPv4.
Implementing Scenario
You can use the VPC wizard to create the VPC, subnets, NAT gateway, and optionally, an egress-only Internet gateway. You must specify an Elastic IP address for your NAT gateway; if you don't have one, you must first allocate one to your account. If you want to use an existing Elastic IP address, ensure that it's not currently associated with another instance or network interface. The NAT gateway is automatically created in the public subnet of your VPC.
These procedures include optional steps for enabling and configuring IPv6 communication for your VPC. You do not have to perform these steps if you do not want to use IPv6 in your VPC.
(Optional) To allocate an Elastic IP address for the NAT gateway (IPv4)
- Open the Amazon VPC console at https://console.aws.amazon.com/vpc/.
- In the navigation pane, choose Elastic IPs.
- Choose Allocate new address.
- Choose Allocate.
To create a VPC
- Open the Amazon VPC console at https://console.aws.amazon.com/vpc/.
- On the VPC dashboard, choose Launch VPC Wizard.
- Choose the second option, VPC with Public and Private Subnets, and then choose Select.
- (Optional) You can name your VPC and subnets to help you identify them later in the console. You can specify your own IPv4 CIDR block range for the VPC and subnets, or you can keep the default values.
- (Optional, IPv6-only) For IPv6 CIDR block, choose Amazon-provided IPv6 CIDR block. For Public subnet's IPv6 CIDR, choose Specify a custom IPv6 CIDR and specify the hexadecimal pair value for your subnet, or keep the default value. For Private subnet's IPv6 CIDR, choose Specify a custom IPv6 CIDR. Specify the hexadecimal pair value for the IPv6 subnet or keep the default value.
- In the Specify the details of your NAT gateway section, specify the allocation ID for an Elastic IP address in your account.
- You can keep the rest of the default values on the page, and choose Create VPC.


Because the WebServerSG and DBServerSG security groups reference each other, create all the security groups required for this scenario before you add rules to them.
To create the WebServerSG and DBServerSG security groups
- Open the Amazon VPC console at https://console.aws.amazon.com/vpc/.
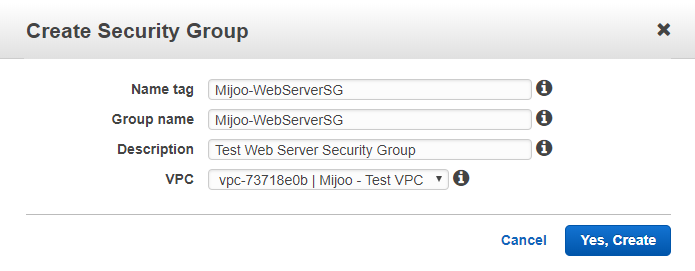
- In the navigation pane, choose Security Groups, Create Security Group.
- Provide a name and description for the security group. In this topic, the name
WebServerSGis used as an example. For VPC, select the ID of the VPC you created and choose Yes, Create. - Choose Create Security Group again.
- Provide a name and description for the security group. In this topic, the name
DBServerSGis used as an example. For VPC, select the ID of your VPC and choose Yes, Create
To add rules to the WebServerSG security group
- Select the WebServerSG security group that you created. The details pane displays the details for the security group, plus tabs for working with its inbound and outbound rules.
- On the Inbound Rules tab, choose Edit and add rules for inbound traffic as follows:
- Choose Type, HTTP. For Source, enter
0.0.0.0/0. - Choose Add another rule, Type, HTTPS. For Source, enter
0.0.0.0/0. - Choose Add another rule, Type, SSH. For Source, enter your network's public IPv4 address range.
- Choose Add another rule, Type, RDP. For Source, enter your network's public IPv4 address range.
- (Optional, IPv6-only) Choose Add another rule, Type, HTTP. For Source, enter
::/0. - (Optional, IPv6-only) Choose Add another rule, Type, HTTPS. For Source, enter
::/0. - (Optional, IPv6-only) Choose Add another rule, Type, SSH (for Linux) or RDP (for Windows). For Source, enter your network's IPv6 address range.
- Choose Save

- On the Outbound Rules tab, choose Edit and add rules for outbound traffic as follows:
- Locate the default rule that enables all outbound traffic and choose Remove.
- Choose Add another rule, Type, HTTPS. For Destination, enter
0.0.0.0/0. - Choose Add another rule, Type, HTTP. For Destination, enter
0.0.0.0/0. - (Optional, IPv6-only) Choose Add another rule, Type, HTTPS. For Destination, enter
::/0. - (Optional, IPv6-only) Choose Add another rule, Type, HTTP. For Destination, enter
::/0. - Choose Save.

You can now launch instances into your VPC.
To launch an instance (web server)
PRIVATE INSTANCE - WINDOWS
PRIVATE INSTANCE - WINDOWS
- Open the Amazon EC2 console at https://console.aws.amazon.com/ec2/.
- From the dashboard, choose Launch Instance.
- Select an AMI and an instance type and choose Next: Configure Instance Details.NoteIf you intend to use your instance for IPv6 communication, you must choose a supported instance type; for example, T2. For more information, seeAmazon EC2 Instance Types.


2. On the Configure Instance Details page, for Network, select the VPC that you created earlier and then select a subnet. For example, launch a web server into the public subnet and the database server into the private subnet.
- (Optional) By default, instances launched into a nondefault VPC are not assigned a public IPv4 address. To be able to connect to your instance in the public subnet, you can assign a public IPv4 address now, or allocate an Elastic IP address and assign it to your instance after it's launched. To assign a public IPv4 address now, ensure that you choose Enable from the Auto-assign Public IP list. You do not need to assign a public IP address to an instance in the private subnet.NoteYou can only use the auto-assign public IPv4 feature for a single, new network interface with the device index of eth0. For more information, see Assigning a Public IPv4 Address During Instance Launch.
- (Optional, IPv6-only) You can auto-assign an IPv6 address to your instance from the subnet range. For Auto-assign IPv6 IP, choose Enable.

- On the next two pages of the wizard, you can configure storage for your instance, and add tags. On the Configure Security Group page, choose the Select an existing security group option, and select one of the security groups you created earlier (WebServerSG for a web server or DBServerSG for a database server). Choose Review and Launch.

- Review the settings that you've chosen. Make any changes that you need and choose Launch to choose a key pair and launch your instance.


If you did not assign a public IPv4 address to your instance in the public subnet in step 5, you will not be able to connect to it. Before you can access an instance in your public subnet, you must assign it an Elastic IP address.
To allocate an Elastic IP address and assign it to an instance (IPv4)
- Open the Amazon VPC console at https://console.aws.amazon.com/vpc/.
- In the navigation pane, choose Elastic IPs.
- Choose Allocate new address.
- Choose Allocate.NoteIf your account supports EC2-Classic, first choose VPC.
- Select the Elastic IP address from the list and choose Actions, Associate address.
- Select the network interface or instance. For Private IP, select the corresponding address to associate the Elastic IP address with and choose Associate.
You can now connect to your instances in the VPC. For information about how to connect to a Linux instance, see Connect to Your Linux Instance in the Amazon EC2 User Guide for Linux Instances. For information about how to connect to a Windows instance, see Connect to Your Windows Instance in the Amazon EC2 User Guide for Windows Instances.
PUBLIC INSTANCE - LINUX


Implementing Scenario 2 with a NAT Instance
You can implement scenario 2 using a NAT instance instead of a NAT gateway. For more information about NAT instances, see NAT Instances.
You can follow the same procedures as above; however, in the NAT section of the VPC wizard, choose Use a NAT instance instead and specify the details for your NAT instance. You will also require a security group for your NAT instance (


After selecting the instance, configure it.


Disabling Source/Destination Checks
NATSG), which allows the NAT instance to receive Internet-bound traffic from instances in the private subnet, as well as SSH traffic from your network. The NAT instance can also send traffic to the Internet, so that instances in the private subnet can get software updates.
To create the NATSG security group
- Open the Amazon VPC console at https://console.aws.amazon.com/vpc/.
- In the navigation pane, choose Security Groups, and the choose Create Security Group.
- Specify a name and description for the security group. In this topic, the name Mijoo-
NATSGis used as an example. For VPC, select the ID of your VPC and choose Yes, Create.

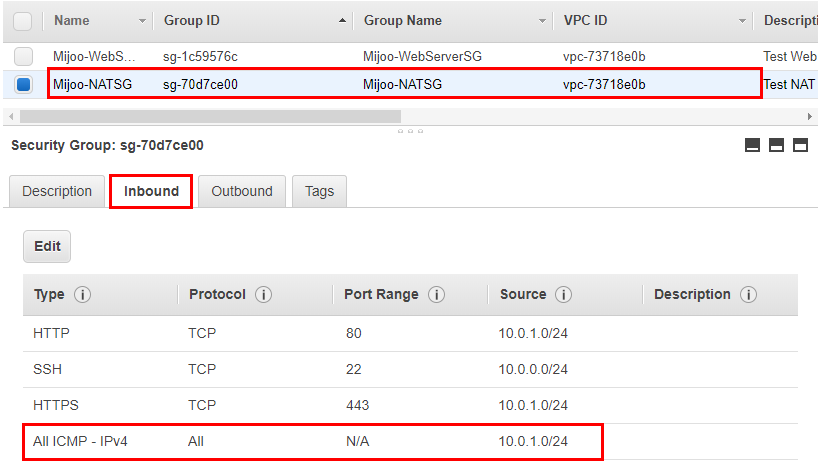
- Select the NATSG security group that you created. The details pane displays the details for the security group, plus tabs for working with its inbound and outbound rules.
- On the Inbound Rules tab, choose Edit and add rules for inbound traffic as follows:
- Choose Type, HTTP . For Source, enter the IP address range of your private subnet.
- Choose Add another rule, Type, HTTPS. For Source, enter the IP address range of your private subnet.
- Choose Add another rule, Type, SSH. For Source, enter your network's public IP address range.
- Choose Save.

- On the Outbound Rules tab, choose Edit and add rules for outbound traffic as follows:
- Locate the default rule that enables all outbound traffic and choose Remove.
- Choose Type, HTTP. For Destination, enter
0.0.0.0/0. - Choose Add another rule, Type, HTTPS. For Destination, enter
0.0.0.0/0. - Choose Save.

Setting up the NAT Instance
1. Launch an instance into your public subnet from an AMI that's been configured to run as a NAT instance. Amazon provides Amazon Linux AMIs that are configured to run as NAT instances. These AMIs include the stringamzn-ami-vpc-nat in their names, so you can search for them in the Amazon EC2 console.
Note
We recommend that you always use the latest version of the NAT AMI to take advantage of configuration updates.
If you add and remove secondary IPv4 CIDR blocks on your VPC, ensure that you use AMI version
amzn-ami-vpc-nat-hvm-2017.03.1.20170623-x86_64-ebs or later.
After selecting the instance, configure it.

On the Configure Security Group page, select the Select an existing security group option, and select the NATSG security group that you created. Choose Review and Launch.

Disabling Source/Destination Checks
Each EC2 instance performs source/destination checks by default. This means that the instance must be the source or destination of any traffic it sends or receives. However, a NAT instance must be able to send and receive traffic when the source or destination is not itself. Therefore, you must disable source/destination checks on the NAT instance.
You can disable the
SrcDestCheck attribute for a NAT instance that's either running or stopped using the console or the command line.
To disable source/destination checking using the console
- Open the Amazon EC2 console at https://console.aws.amazon.com/ec2/.
- In the navigation pane, choose Instances.
- Select the NAT instance, choose Actions, Networking, Change Source/Dest. Check.
- For the NAT instance, verify that this attribute is disabled. Otherwise, choose Yes, Disable.
- If the NAT instance has a secondary network interface, choose it from Network interfaces on the Description tab and choose the interface ID to go to the network interfaces page. Choose Actions, Change Source/Dest. Check, disable the setting, and choose Save.

Updating the Main Route Table
The private subnet in your VPC is not associated with a custom route table, therefore it uses the main route table. By default, the main route table enables the instances in your VPC to communicate with each other. You must add route that sends all other subnet traffic to the NAT instance.
To update the main route table
- Open the Amazon VPC console at https://console.aws.amazon.com/vpc/.
- In the navigation pane, choose Route Tables.
- Select the main route table for your VPC (the Main column displays Yes) . The details pane displays tabs for working with its routes, associations, and route propagation.

- On the Routes tab, choose Edit, specify
0.0.0.0/0in the Destination box, select the instance ID of the NAT instance from the Target list, and then choose Save. - On the Subnet Associations tab, choose Edit, and then select the Associate check box for the subnet. Choose Save.

Testing Your NAT Instance Configuration
After you have launched a NAT instance and completed the configuration steps above, you can perform a test to check if an instance in your private subnet can access the Internet through the NAT instance by using the NAT instance as a bastion server. To do this, update your NAT instance's security group rules to allow inbound and outbound ICMP traffic and allow outbound SSH traffic, launch an instance into your private subnet, configure SSH agent forwarding to access instances in your private subnet, connect to your instance, and then test the Internet connectivity.
To update your NAT instance's security group
- Open the Amazon EC2 console at https://console.aws.amazon.com/ec2/.
- In the navigation pane, choose Security Groups.
- Find the security group associated with your NAT instance, and choose Edit in the Inbound tab.
- Choose Add Rule, select All ICMP - IPv4 from the Type list, and select Custom from the Source list. Enter the IP address range of your private subnet, for example,
10.0.1.0/24. Choose Save.
- In the Outbound tab, choose Edit.
- Choose Add Rule, select SSH from the Type list, and select Custom from the Destination list. Enter the IP address range of your private subnet, for example,
10.0.1.0/24. Choose Save. - Choose Add Rule, select All ICMP - IPv4 from the Type list, and select Custom from the Destination list. Enter
0.0.0.0/0, and then choose Save.

Connecting to Your Windows Instance


Comments
Post a Comment